
Getting Started: Setting Up Templates and Publishers
To set up invoices, you need to work in three sections in Yield: Publisher account, Invoices and Document templates. You can work between the sections as you wish. In this document, we'll first cover setting up the document templates and then setting it up for the publisher account and finally generating the invoices.
Setting Up the Document Templates
The document templates are used to generate invoices. Essentially, they are HTML documents that can contain macros, such as {{invoiceEUR}} , which are replaced with the invoice sum when the document or invoice is generated. More advanced macros are also available, allowing you to handle lists, conditions, and other logic—for example, to display a list of revenue by segment. This functionality is provided by a third-party library, and the syntax is documented here: https://handlebarsjs.com
We will always assist you with this during the onboarding phase, but feel free to contact support if it becomes complex. We understand that it can be challenging.
You can find the Document Templates in the Admin:

To create a new document template, click Add at the bottom of the page. This is how the document template appears when you start editing or creating a new one:
Options:
-
Type: Type of template. For invoicing statements and info letters, always select invoice template.
-
Subject: Email subject. Note that you can use macros here, just as in the actual document.
-
Insert macro in content: Here you can choose from the available macros, and it will be inserted at the cursor position in the document below. This does not work in Source mode, where HTML is edited directly.
Using Data Tables in the Document Templates
When creating tables in documents (currently the list of segments or sites with revenue), there is unfortunately no easy way to insert the necessary {{#each}} and {{#if}} macros directly using the editor in the normal WYSIWYG mode.
Instead, you need to edit the HTML directly by clicking the Source button in the top-left corner.
In the example below, we want to show one table row (<tr> element) for each segment. The approach we might try first, which will not work, is as follows:
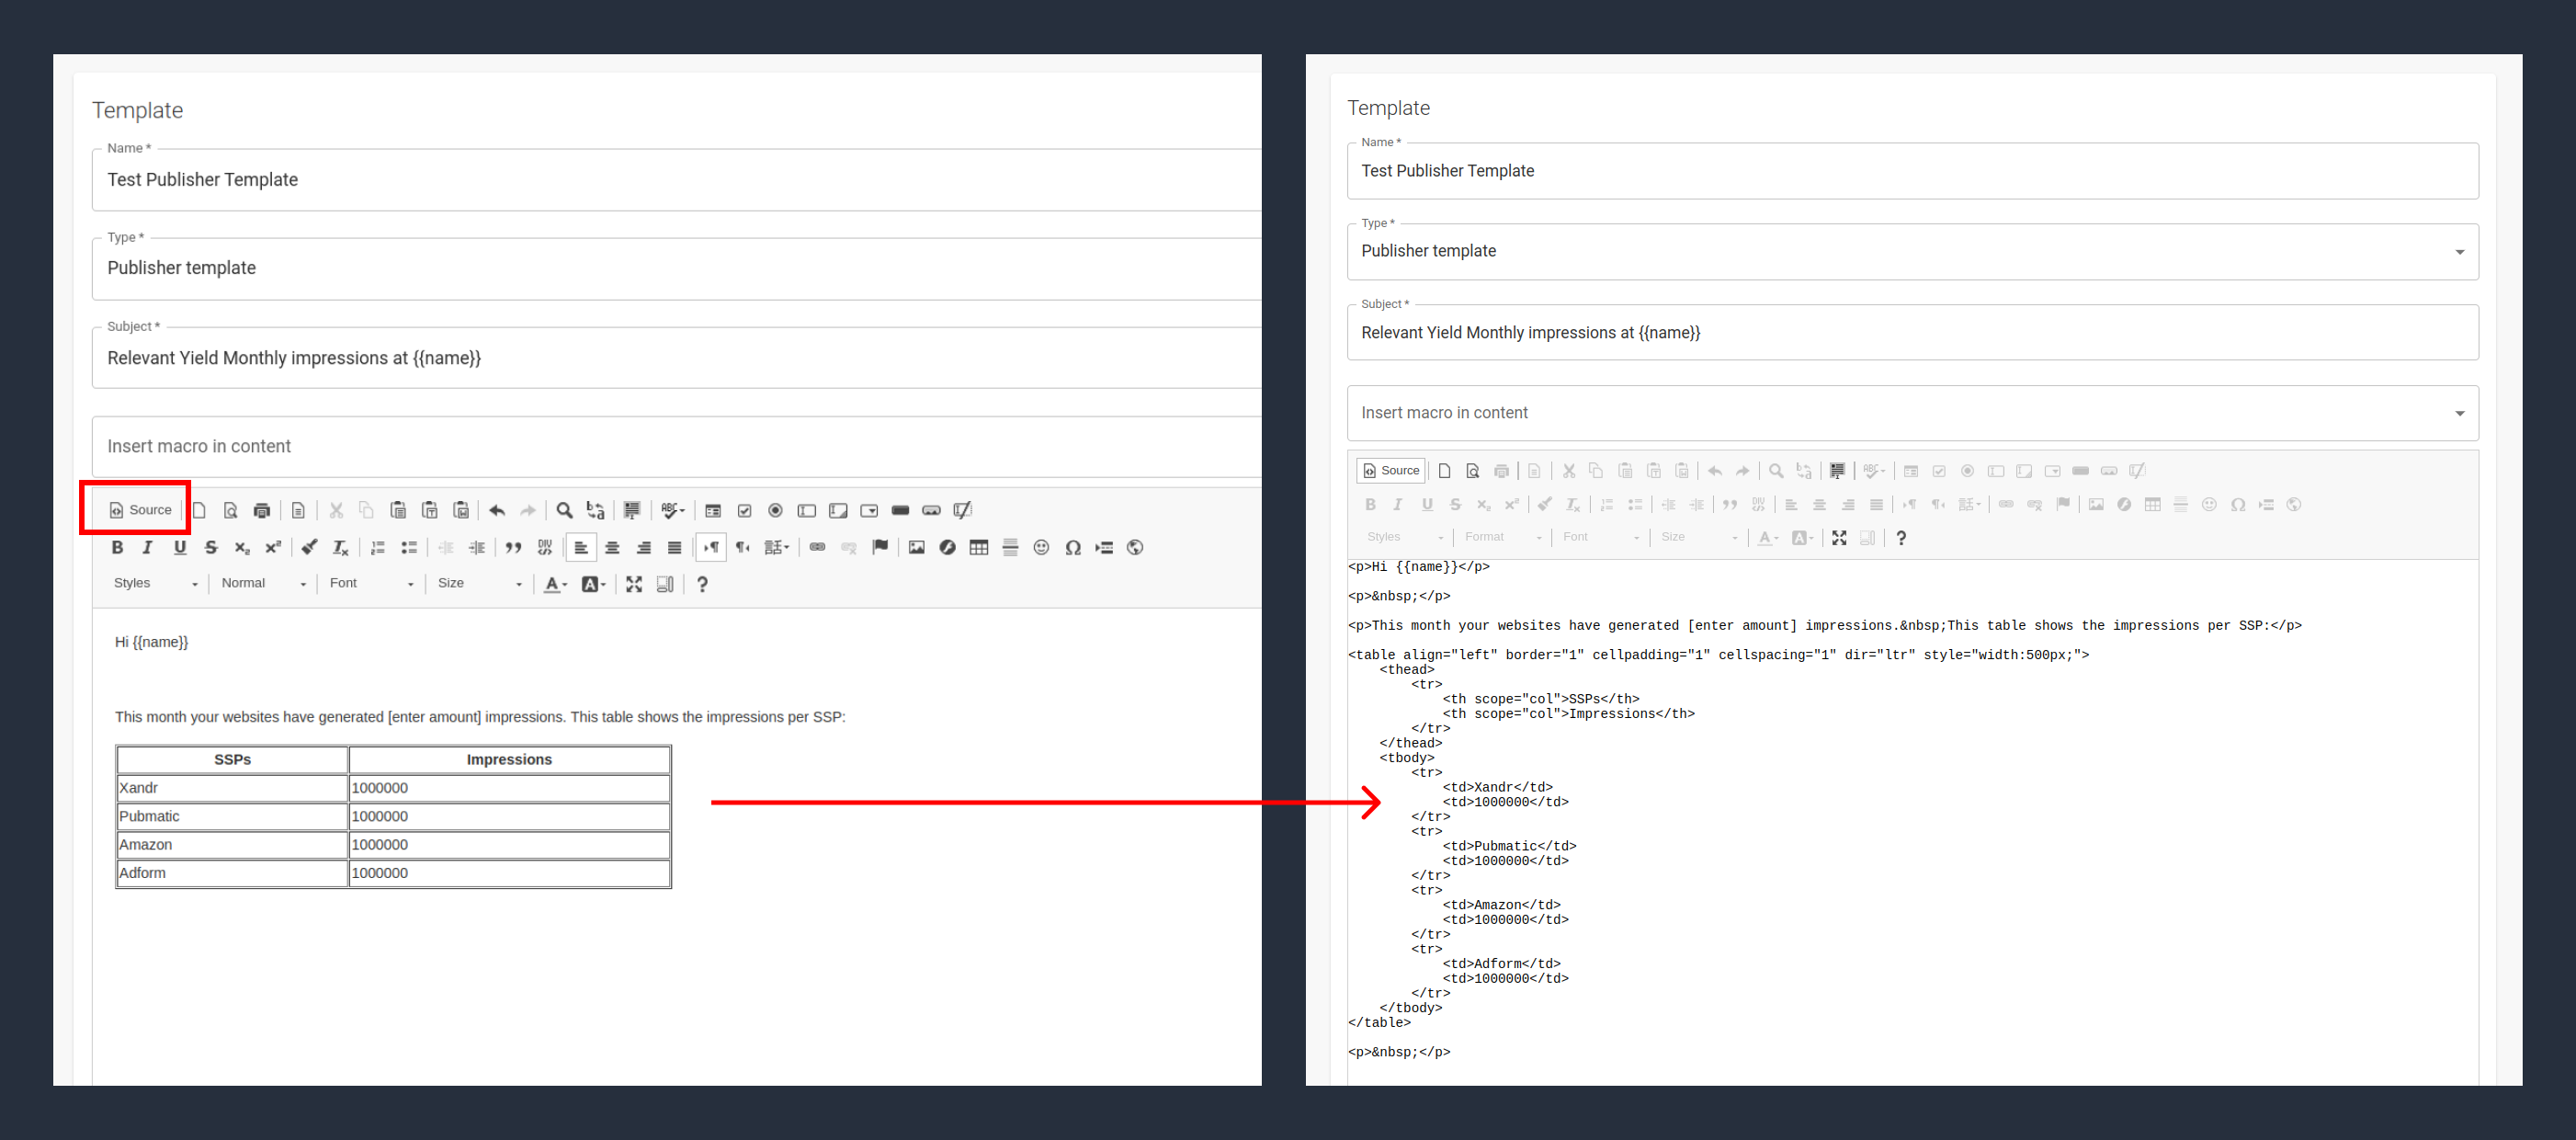
Unfortunately, the HTML editor will remove all text placed between table rows. Because of this, a workaround is required. If you create an HTML element with an attribute named macro, this element will be replaced by only the content inside the macro attribute.
The code will work, and the extra <tr> elements with the macro attribute will not appear in the generated document.
Creating Report Tables and Links in the Document
It is not always obvious which reports should be included as tables and links in the documents. Should it be per site, per segment, just per date, or should it include a table, a chart, or both? Therefore, it is possible to dynamically create tables and links to different report types that can be included.
Report Tables
Included tables currently support only one level, so you cannot, for example, group by site and then by segment. For report links, there is no such limitation.
To copy a report table into your invoice, navigate to Reports → New Report (or choose an existing report) → select a report type → adjust report settings → Other Options → Copy as Invoice Table.
Example: We will create a table that shows an Ad Revenue Insights report by revenue type (Deals, Direct, or OpenRTB), the amount of revenue reserved for your publisher, and the number of impressions sold for them.

Then click Other Options and the Copy as invoice table button to copy the desired report table to the clipboard. Note that the Start Date and End Date will change dynamically to the invoice period, and that Filter by → Publishers will automatically use the value of the publisher. These settings will not be copied, so you do not need to worry about them.
Now we can paste the table as a new table or into an existing table in the document template, and it will look something like this:
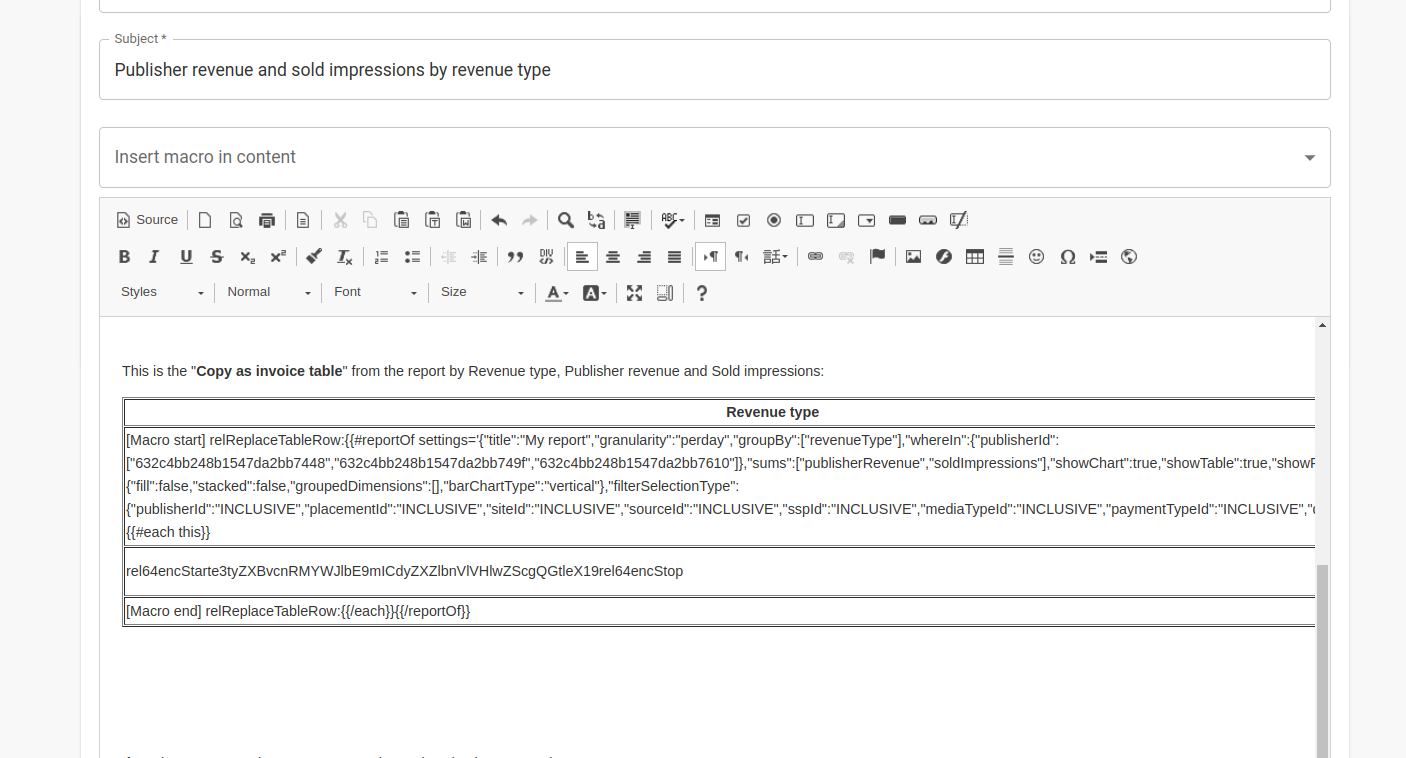
As you can see, the content may look somewhat unusual, but the important points are as follows:
-
The first and last rows below the header (starting with
[Macro start]and[Macro end]) will not be part of the generated document. If you copy the rows into another table, make sure to include all three rows below the header, as the start and end rows are required. -
The middle row is the template for all rows that will appear depending on the report results. You can apply styling, such as making the text bold, to all cells in the middle row, including the first cell, which will be the label (for example, a site name or a revenue type). Ensure that you select all the text in the cell when applying styling, including the surrounding
andrel64EncStart/rel64EncStoptexts. -
You can change the order of the columns if desired. For example, you may want Publisher revenue to appear before Total revenue. Make this adjustment in the middle template row.
Fixing the Border Style
As you may notice when pasting the table as a new table, the default styling uses double lines. Unfortunately, there is no easy way to fix this in the editor, so you need to manually add CSS styling if you prefer a different appearance.
-
Right-click on the table and select Table Properties.
-
Select the Advanced tab.
-
In the Style textbox, append the following text (do not remove any existing text if present):
border-collapse:collapse; -
Press OK. The border should now have a more modern single-line design.
Important: Check that the table is not too wide for a PDF.
Ensure the width of the table does not exceed approximately 750px to fit into the PDF version of the invoice. You can preview a non-generated invoice to check this. If the table is too wide, you can either use the mouse to shrink the columns or table, or adjust the Width setting in Table Properties from the right-click menu.
Report links
Report links can be created easily by clicking Copy as Invoice Link under Other Options in the report settings, located next to Copy as Invoice Table. You can then paste the link into the document template, and the text will default to the report’s title.
Getting started: Global Invoice Settings
The Edit Global Invoice Settings option on the Invoice Statement workspace page opens the following dialogue:

For each language in which you want to send invoices, you must select the corresponding document templates. The language will be the one selected for the publisher; initially, all are set to English. If you are unsure how to create a new document template, there is no need to worry, as this will be covered later in this document.
- Minimum Invoice (EUR): This is the threshold at which actual invoice statements are sent instead of short info notices.
- Invoice Mail CC Address: Each invoice sent will be CC’ed to this address or addresses. Use semicolons to separate multiple addresses if required.
Edit Revenue Corrections in the Invoice Statement View
As invoices from the SSPs and ad servers are received, we need to update the total revenue recorded. The differences between these amounts and the report figures will be applied as corrections in subsequent invoices. This is also covered in the "Monthly Procedure".

For each SSP and ad server, and for each month, you have the option to enter a manual number. This should be the total revenue received for that month from the system, not the month in which the money was actually received.
You also have the option to add any additional costs if applicable. If no publishers are selected under Limit to Certain Publishers, all publishers will share the cost. The correction for each publisher will be proportional to their revenue.
Generating an Invoice
To generate an invoice, go to Invoices. Select the last month for which you want to generate the invoice, and then click the Load New (Non-Generated) Invoices button.

The invoices will appear below. You can generate them in bulk by selecting all or some invoices and then clicking the Generate button above, or generate them individually by clicking the ![]()
button next to each invoice.

Other Actions
 Edit: Edit a generated invoice.
 Download as PDF: Download the invoice to your device as a PDF file.
 Preview: Preview the invoice statement file before sending or to view your edits.
 Delete: Delete the generated invoice.
 Send: Send the invoice to the emails defined under the publisher account.
Extra Correction per Invoice
To add extra corrections for an individual invoice, click Extra Corrections on the edit page of the invoice after generating the first version. Note that the Edit option will not be available until the invoice has been generated. First generate the invoice, and then click the Edit button. Locate the Extra corrections button at the top of the page.

Add corrections by clicking on the + icon, give a reason for the correction, set the amount and currency if needed. Click Ok to save.

Please note that the corrections will not be applied until you regenerate the invoice.
To regenerate the invoice, click on the Re-generate Invoice button at the bottom of the Edit invoice page. Depending on how your document template is configured, the formatting of the added extra correction line may vary.
Monthly Procedure Suggestion
Each month, when you prepare your invoice statements, you may also need to include corrections. These corrections represent the difference between the API data from the SSPs and the actual payment amounts stated on the SSPs’ own invoices.
Always use the CHECK REPORT REVENUE button to verify whether there is a significant discrepancy (greater than roughly 3%) between the value you intend to enter and the reported revenue. If such a discrepancy exists, it’s recommended to contact the Relevant Yield support team for further investigation.
If everything looks correct, proceed with the following steps:
-
Correct monthly revenues from SSPs as the payments arrive. This can be done either before or after generating the invoices. These adjustments will appear as “corrections” on subsequently generated invoices.
-
Add any additional monthly corrections, if necessary. Please note that this step must be repeated each month.
-
Generate, review, and send the invoice statements and informational notices.
Setting Up the Publisher Account Invoice Info
To set up the invoices for a specific publisher account, open its settings and navigate to Invoicing and ARI report data section.
Mandatory settings:
- Invoice Email – The recipient or recipients of the invoices. You can use semicolons to separate multiple email addresses.
- Language – Document templates for the selected language must be set up in Global Invoice Settings (see below). Otherwise, the documents cannot be generated for the publisher.


Optional settings:
- Minimum invoice EUR – Overrides the setting for this particular publisher in the Global invoice settings.
- Invoice Statement Template – Overrides the default Invoice template for the publisher.
- Balance Info Template – Overrides the default Info letter template for the publisher.
What Does Everything Mean in the Workspace?

The above page is accessible via the Invoices in the left menu. You can use the filters to view the past invoices in the list. The invoices in the invoice listing will have any of the following statuses:
- Non-generated: This invoice has not been generated yet, but it will show the content of the invoice once generated.
- Ready: An invoice that has been generated but not yet sent. This is the only status where editing the invoice is possible. Once an invoice is generated, its content becomes fixed (for example, it will not change if the publisher’s report data is updated). You should not keep invoices in the Ready state for an unnecessarily long time before sending them.
- Sent: The invoice statement has been sent, but the publisher has not yet been paid.
- Settled: The invoice has been received and the payment has been completed.
The types can be the following:
- Invoice: An invoice statement.
- Info: An information letter sent to audience publishers who have not yet reached the minimum cumulative sum for an invoice. This limit is configurable at both global and publisher levels and can potentially also be used for programmatic purposes.
The actions that can be performed on each invoice depend on its status. For example, only a Ready invoice can be sent. If you select multiple invoices using the checkboxes, the actions you perform with the buttons above the list will only apply to the selected invoices.